Entitled to Freshness

Imagine you’re a company that has a 2 billion row fact table joined to a 100k row entitlements table built for row-level security. The fact table updates monthly, but entitlements change every time someone gets promoted, quits, changes title, etc. You can’t just refresh the whole data model monthly, because you’d end up with the wrong security rules applied. You also can’t refresh the entire data model multiple times a day, because refreshing that fact table would put a huge toll on your back-end systems as well as your Tableau Server. Within the Tableau UI, however, there’s no option to independently refresh the different parts of a datasource – if you schedule a refresh for your entitlements table, it’ll refresh your entire datasource.

Sometimes when you open Tableau, you’ll find that out-of-the-box functionality takes care of…well pretty much all of your needs. There are a handful of places, however, when you’ll really need to tap into the APIs. One such use case is for row-level security scenarios where you a) can’t use Virtual Connections and b) need to refresh your entitlements table more frequently than your fact table.

Quick vocab break: an Entitlements Table is a table which tells us who can see which data. This table should be updated as people gain/lose access to other data.

So how do we solve this? Well option 1, as mentioned above, is Virtual Connections. This allows independent scheduling for each table in the VConn, giving you the mixed freshness you desire. But some folks can’t use VConns – maybe the fact table refresh would time out, maybe you’re using an unsupported connector, maybe you have weird auth issues. How can we approach the problem in this case?

Luckily, there’s a combination of the Hyper API and the REST API in Tableau that can address this very efficiently.

  1. Create an extract of your fact and entitlements tables using the Hyper API.
  2. Open these in Desktop, create a data model, and publish.
  3. Schedule no refreshes in Tableau at all!
  4. When entitlements change, re-create your Entitlements table using the Hyper API.
  5. Use Tableau’s new(ish) APIs to update just the entitlements portion of your datasource.

Now depending on the type of person you are, that either sounds really easy or really hard, so I’m going to break it down bullet by bullet. There’s a github repository with some shoddy Python code available here.

1. Create Extracts Using Hyper API

This is the heaviest lift part of it all. The first question you’re asking is “why don’t I just use Desktop to create these?”, and it’s a valid question. For the initial publish, it’s certainly possible, but to enable a live-to-Hyper connection (which we’ll need later), we need to make sure we’re not setting this up through the native UI. The Hyper API is designed to build extract files outside of Tableau, which is exactly what we need. I’ve built a sample script here which shows how you could do it from a SQL Server deployment.

The file this creates is a single Hyper file which contains two tables: “Fact” and “Entitlement”. Because a Hyper file is data (as opposed to metadata), this doesn’t yet enforce any data security or have any relationship between the two tables.

2. Create a Data Model

Double-click the Hyper file you created in Step 1 to open it in Desktop. From here, you can build your data model (join the tables but also write whatever calculations you need etc). You’ll also want to take this opportunity to build in your row-level security. Now that you’ve got data which is joined, enhanced, and secured, you can publish it to your Tableau deployment. This is no different than a normal publish process, except that the datasource (having been built/published differently) is eligible for live-to-Hyper updates.

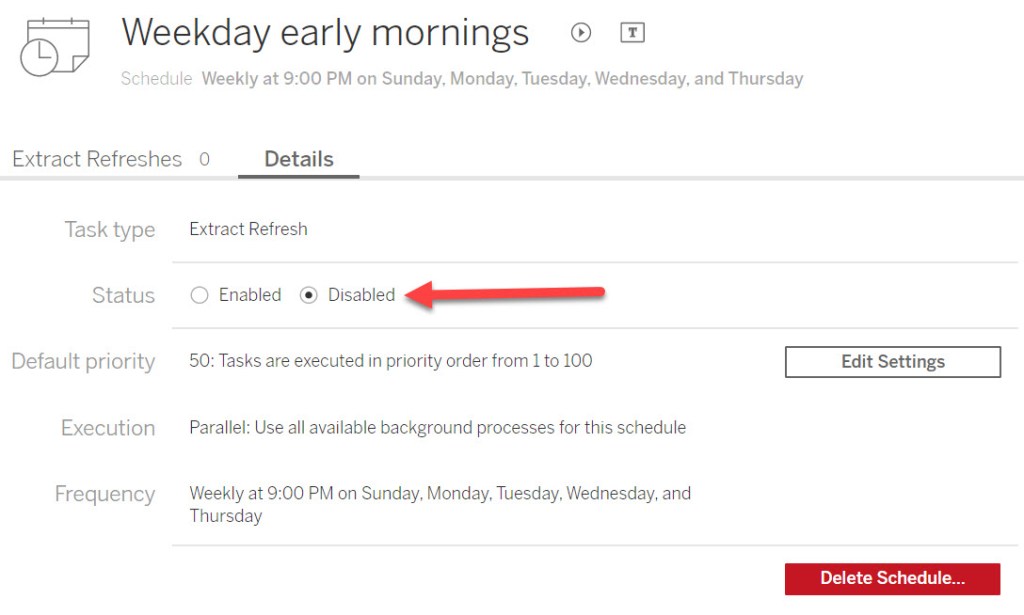
3. Schedule No Refreshes!

You’ve got it. Just resist the temptation to schedule anything in Server or Cloud. Because of the way this was built, you shouldn’t be able to anyway.

4. Re-build Entitlements as Needed

So far, we’ve just found a difficult path to creating a normal datasource, so there better be a payoff. This is where it happens. Now imagine someone leaves your company or changes titles – they need data access revoked immediately. Historically, we’d force you to refresh your entire data model. This could take hours, be quite costly, and may not even finish before you want to update it again.

With these APIs, however, we can just re-build the Entitlements table. We can re-use the script from step 1 here, but cut out all of the lines about the Fact table. We’re rebuilding just the smaller table, which will likely take mere seconds.

5. Replace the Server-Side Entitlements

All we’ve done now is create a smaller local Hyper file. It contains none of my actual data, just my entitlements. If we were to publish this from Desktop, it would create its own datasource. Instead, we can push this table to overwrite just a portion of our existing datasource. The code provided here shows you how to

  1. Execute step 4 (above)
  2. Identify your target datasource
  3. Initiate a file upload (large files must be chunked, small files can be uploaded all as one)
  4. Commit the file upload to the appropriate data source and table name.

This is the final portion of the code. As long as your datasource ID, schema name, and table name line up, you can easily replace the entitlements table without touching the fact table!

6. Confirm It Worked!

Now go re-load any dashboard downstream of that data. The data won’t have changed, but the entitlements will have. Anyone promoted will have their enhanced access, anyone who quit will lose all access. This means you can easily kick off a flow many times a day, as people gain and lose access, without any worry about bogging down your system!

What Else?

This example is intentionally narrow, and built to solve a specific problem. There’s tons more you can do with these APIs, though! If you have a massive fact table and want to add just a small number of rows to it, this API allows you to append. If you want to maintain a file which has a rolling 12-month snapshot, you can write a simple script to delete-and-add rows. All up, this allows you far more flexibility than Tableau’s traditional refresh. Choose what data you care about, down to the row level, and manipulate it as you see fit!

[Multi-Value, Multi-Column] Row Level Security: Solving an Array of Use Cases

Virtual Connections have completely changed how Tableau connects to data, streamlining the processes of credential management and extract refreshes, while also reducing duplicate queries against your expensive databases. It also introduces the concept of centralized row-level security, or CRLS. Having a single point to create, audit, and edit your security policies allows for instant scaling of your data governance, and it also allows for better distribution of responsibilities.

In pre-VConn Tableau, the people building your datasources and workbooks were also the people responsible for building governance. This isn’t how most organizations work, however: data governance and dashboard buildouts are two totally separate functions. By separating VConn creation out from the analytic tasks, we let governance owners do what they do best, and let analysts confidently build, knowing that they don’t have to worry about security.

 Before VConns, governance was applied at every datasource or workbook. Even similar datasources required duplicate credentials, duplicate refreshes, and duplicate RLS policies.
With VConns, there’s a single point of governance application. This frees up backgrounders from duplicate refreshes, allows data stewards to set governance in a single place, and can save on costly duplicate queries against your data stores. 

All that said, this has brought an increased focus on Tableau’s existing row level security approaches. Many of the approaches detailed in the whitepaper rely on multiple joins, and VConns currently support only a single join. On top of that, people often have complex data models and rules. It’s not uncommon for data entitlements to be based on multiple columns, each of which have multiple values.

Consider a Regional Sales VP for certain categories. They may have access to their product categories across the whole country, but also have access to ALL sales within their regions. We need to evaluate two separate entitlements and check if either of them has been fulfilled. Traditionally, these may be kept in two separate entitlements tables. We have techniques for doing this in the whitepaper, but they require multiple joins, and VConns only supports a single entitlements table.

 Traditional RLS approaches would have you join both of these tables and do some calculation magic.

With VConns, however, we can combine these into a single entitlements table that represents all our entitlements, gives us an efficient query path to searching them, and provides a simple audit interface for our admins. Simply create one column for each entitlement (Category and Region, here) and populate them with pipe-separated arrays. You’ll have one row for each user which displays their entitlements.

 It’s easy to look at this table and find who can see what, and it also allows easy insertion of an ALL value instead of a complete list.

All that’s left is stitching this together with our fact table.

  1. Create a cross-join between your fact table and your entitlements table.
    • This is a scary first step, but just trust me for now. I know if we went on to evaluate this entire query, we’d end up with a massive dataset. The good news is that we’ll never actually execute the cross-join against the full tables, so for now, simply join on 1=1.
  2. Create a policy that checks for USERNAME() = [User] match.
    • This is the key to making the cross-join performant. This policy will act as a WHERE clause in our query, and (because we only have 1 row per user) it will filter our entitlements table down to a single row. Because of what’s referred to as “Filter Pushdown”, any decent database will perform this filter before joining the tables, so our cross-join will join our fact table to a 1-row entitlement table, creating no duplication at all.
    • Our data structure is now a non-duplicated copy of the fact table, but with the current user’s entitlements added onto every row as new columns. A small sample may look like this:
  3. Create a policy that checks entitlements.
    • First, we’ll check the Region entitlement. We need to check two things: is the entitlement ALL and, if not, does the Region on each row match the entitlement.
    • [Region Entitlement] = “ALL” OR (CONTAINS([Region Entitlement], [Region])
    • This calculation returns TRUE if the user is entitled to ALL or if the region in question is contained in their [Region Entitlement] array.
    • Repeat for each other entitlement you need! In this case, it’s just one more entitlement. Because we want to check either of these entitlements, we’ll use an OR statement, but if you want to check both you can use AND.

Voila! We’ve implemented governance against a single table, using only 1 entitlements table. It’s a flexible policy, allowing for ANDs and ORs, multi-value lists, and multiple entitlements. It’s easy to read, and, when combined with VConns, it’s easy to implement in a single place…and flow downstream to your entire server. No more worrying about searching out every workbook, no more downloading 500 workbooks to edit them, and no more managing multiple entitlements tables.

Handling governance centrally lets your BI Analysts do BI, and lets your Governance Analysts handle the governance. It allows you to centralize the security, but also all of the connection metadata, making administration a breeze. It lets your end users trust that the data is correct and secure, and reduces the nerves of the folks in your InfoSec department. Implementing complex RLS at scale has never been so easy!

Publishing TDS Datasources Using Tableau Prep

NOTE: Tableau went and fixed this in 19.3.1, so if you’re using that or a newer version, stop reading here and just accept that it all works!

Though Tableau originated as a visualization tool, it has added significant ETL processes over the last couple versions. With version 18.1 it added Tableau Prep and the ability to build ETL flows, and 19.1 added Prep Conductor, which comes with the ability to automate workflows to run on a schedule. One current limitation, however, is that Tableau Prep outputs a .hyper file, not a .tdsx file. What’s the difference here?

In Tableau, a .hyper file is a raw data file. It contains the results of the data from the datasources as well as any calculations which can be materialized at the individual row level (calculations like string manipulations, differences between two columns, etc.). Calculations which can’t be materialized on individual rows, however, aren’t stored in a .hyper file, but instead are saved in a .tds file (Tableau Datasource). This file contains the logic for level of detail calculations, aggregate calculations (such as ratios), and the username-based calculations often used for row level security. A .tdsx file is the combination of the raw data (.hyper file) and the associated logic (.tds file). Tableau Prep, however, doesn’t allow for the customization of .tds files. If you want to add aggregate calculations, you can do so in Desktop, but when Conductor runs your flow, it will overwrite your entire Datasource, replacing your .tds file with a generic one and losing all of your calculations in the process. Below is a walk-through of how to avoid that behavior.

Before we go any further, it’s worth noting that this workflow will probably be streamlined at some point, but that for now, this is the easiest way of allowing creating a Datasource with data from Prep and .tds-based logic.

  1. Create a Prep flow which outputs a .hyper file to a network-mapped location.
    1. In the Output step of your Prep flow, do not select “Publish as a data source”, but instead choose “Save to File”. You need to ensure that your Prep inputs and outputs are using UNC file paths, so it will continue to work when published to Server.
  2. Publish and schedule the flow.
    1. Simply publish your flow to Tableau Server. You’ll need to ensure that your Run As User has access to the file input/output locations as well as safelisting those file locations for Prep Conductor.
    2. Though we’ll tie this flow to a schedule, we won’t actually be relying on the schedule’s timing to run the flow. Therefore, you’ll want to make it a schedule that you don’t use for anything else and only runs very infrequently. I set mine to run monthly on a schedule named “PrepScriptSchedule”. The reason we need to tie it to a schedule (even though we aren’t relying on timing) is that tabcmd allows us to run a scheduled task.
  3. Open the output of the flow in Tableau Desktop.
  4. Create your Datasource modifications in Desktop (create calculations, Datasource filters, hierarchies)
  5. Publish the Datasource.
  6. Using tabcmd, refresh the .hyper file and publish it without overwriting the Datasource.
    1. If you’re not already using tabcmd, you’ll need to install it.
    2. Log in to the Server using tabcmd login.
    3. Run the Prep flow using tabcmd runschedule.
      1. Because we’re running a schedule (not executing a task on Tableau Server), we’ll need to build in a wait time for our script. This step has started the Prep Flow, but we’ll need to pause until it finishes creating the file.
    4. Pause the script until the flow is complete using SLEEP. This command takes an argument which is the number of seconds to pause your script. You should make sure that the number you input here is higher than the time your Prep Flow takes to run.
    5. Using the tabcmd publish command, point to the .hyper file output from the Prep flow and overwrite the Datasource in question. Use the –replace option to avoid overwriting the .tds, instead just overwriting the source data contained in the .hyper file.
tabcmd login -s https://<server-name> -u <username> -p <password> -t <siteName>
tabcmd runschedule "PrepScriptSchedule"
sleep 1000
tabcmd publish "\\network\filepath\prepoutput.hyper" -n <targetDatasource> --replace

It’s an easy script to run, and can be run on the schedule of your choice using any task scheduler (most likely Windows Task Scheduler or as a cron job). Using the above script we can create Tableau Datasources with Prep ETL, Desktop metadata, and Server security, and refresh it all on a schedule. Go forth and enjoy your complex data structures with complex governance tied in!